
Integration guide
Add the try-on to a product page in a few minutes: a license key, three photos per frame, one tag. Everything else is optional.
Not a developer? The product guide explains what your team prepares: the photos of each frame, their template and the measurements.
Quick start
The script registers a <svalbox-tryon> element. Paste it where the try-on should appear:
<script src="https://svalbox.com/sdk/v7/svalbox.iife.js"></script>

<svalbox-tryon
  license="YOUR-LICENSE-KEY"
  product-id="nora-black"
  front="/glasses/nora/front.png"
  left="/glasses/nora/left.png"
  lenses="/glasses/nora/lenses.png"
  width-mm="138"
  size="4/3">
</svalbox-tryon>
Prefer JavaScript? The same widget as an ES module, with a reference to control it:
<div id="tryon"></div>

<script type="module">
  import { createTryOn } from 'https://svalbox.com/sdk/v7/svalbox.js';

  const tryon = createTryOn('#tryon', {
    license: 'YOUR-LICENSE-KEY',
    size: { aspectRatio: 4 / 3 },
    frame: {
      productId: 'nora-black',
      front: '/glasses/nora/front.png',
      left: '/glasses/nora/left.png',
      lenses: '/glasses/nora/lenses.png',
      widthMm: 138,
    },
  });
</script>
Or with the classic script tag, which exposes a global Svalbox:
<script src="https://svalbox.com/sdk/v7/svalbox.iife.js"></script>
<script>
  // The script tag exposes a global `Svalbox` object.
  const tryon = Svalbox.createTryOn('#tryon', { license: 'YOUR-LICENSE-KEY', frame: { /* … */ } });
</script>
The widget renders in its own shadow DOM: your styles can’t break it, and it can’t affect your page.
Product photos
Three transparent PNGs per frame, prepared in a simple template:
- Front, twice as wide as tall (e.g. 1600×800): the frame fills the middle half, hinges on the horizontal centre line.
- Left temple, square (e.g. 800×800), seen from outside: the arm starts at the left edge, on the centre line.
- Lenses (optional), same framing as the front: opaque where the lenses are. Needed for tints.
The right temple is the left one mirrored, unless you provide it. Download the templates: front · temple (SVG, open in Photoshop, Illustrator or Figma).
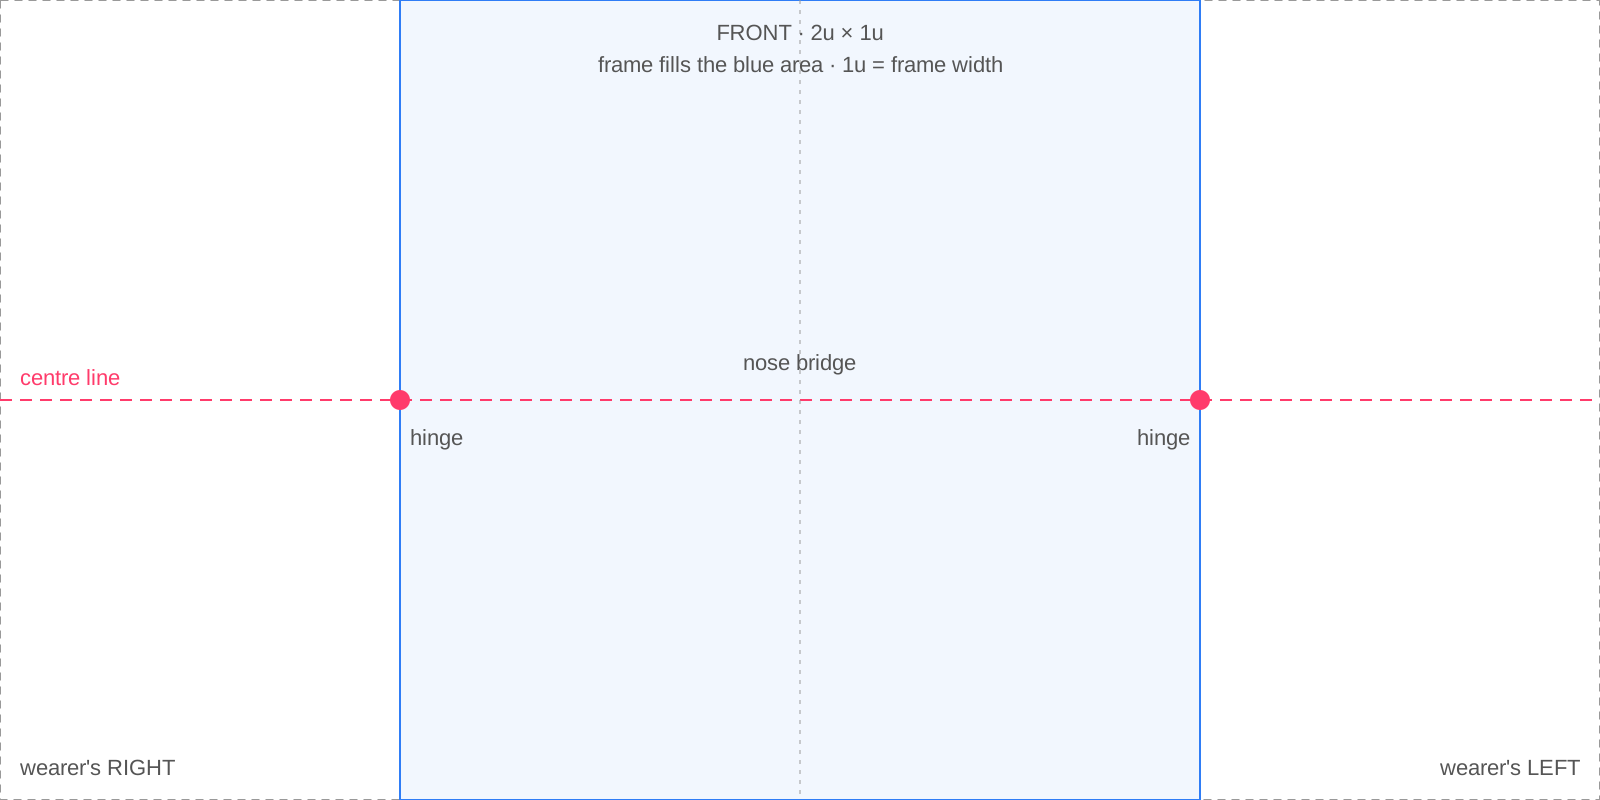
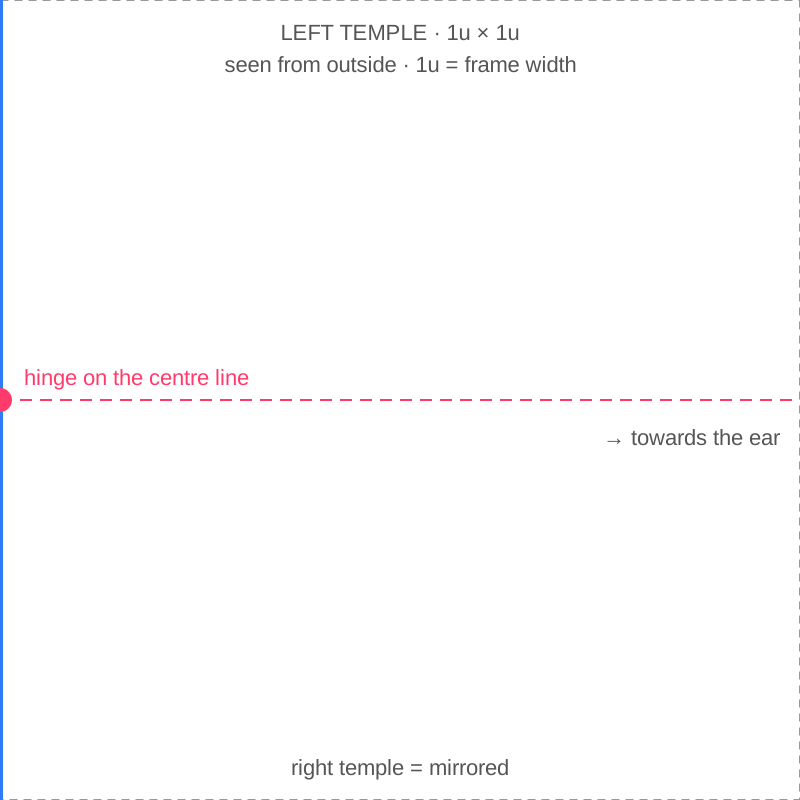
Shooting, cutting out and measuring the frames: see the product guide, written for the team that prepares them.
Changing the frame
Switch frames without reloading, for colour swatches or a product picker. With the web component, change its attributes:
<svalbox-tryon
  id="tryon"
  license="YOUR-LICENSE-KEY"
  front="/glasses/a/front.png"
  left="/glasses/a/left.png">
</svalbox-tryon>

<script>
  // Changing the photo attributes switches the frame live
  // (no reload, the camera keeps running).
  const el = document.getElementById('tryon');
  el.setAttribute('product-id', 'aviator-gold');
  el.setAttribute('front', '/glasses/b/front.png');
  el.setAttribute('left', '/glasses/b/left.png');
</script>
With JavaScript, call setFrame(). Each frame can carry its own settings (size, curve, angles), so keep them with
your product data:
const frames = {
  'nora-black': {
    productId: 'nora-black',
    front: '/glasses/nora/front.png',
    left: '/glasses/nora/left.png',
    lenses: '/glasses/nora/lenses.png',
    widthMm: 138,
  },
  'aviator-gold': {
    productId: 'aviator-gold',
    front: '/glasses/aviator/front.png',
    left: '/glasses/aviator/left.png',
    widthMm: 142,
    wrapMm: 12,
  },
};

// Product picker / colour swatches
document.querySelector('#colour').addEventListener('change', (event) => {
  tryon.setFrame(frames[event.target.value]);
});

// With the web component, the instance is on the element:
document.querySelector('svalbox-tryon').tryon.setFrame(frames['aviator-gold']);
Photos are cached: switching back to a frame, or changing only its settings, is instant.
Lenses
// Flat tint
tryon.setLenses({ tint: ['rgba(30, 30, 35, 0.85)'] });

// Gradient, top to bottom, with a mirror effect
tryon.setLenses({ tint: ['rgba(90, 50, 20, 0.8)', 'rgba(150, 100, 60, 0.2)'], reflectivity: 0.4 });

// Clear lenses
tryon.setLenses({ tint: [] });
Tints and reflections need the frame’s lenses mask.
Starting the camera
With the camera, the widget shows a start button and only opens the camera when the visitor clicks it. Meanwhile the face tracker downloads in the background, so the start is instant. Videos and photos start on their own.
// Your own button instead of the built-in one
const tryon = createTryOn('#tryon', { license, frame, startButton: false });
document.querySelector('#try-it').addEventListener('click', () => tryon.play());

// Pause when the product modal closes, resume later
modal.addEventListener('close', () => tryon.pause());

// Don't download anything until the visitor clicks
createTryOn('#tryon', { license, frame, preload: false });

// A video or a photo instead of the camera (they start on their own)
tryon.setSource({ type: 'video', src: '/media/model.mp4' });
tryon.setSource({ type: 'image', src: '/media/model.jpg' });
tryon.setSource({ type: 'camera' });
Size and layout
The widget’s size is set once, when it mounts, so the page never jumps. By default it fills its container; if the container has
no height, it takes a 4:3 box as wide as the container. The video is fitted inside with fit.
| size | ||
|---|---|---|
| 'container' | default | Fills the container (4:3 if the container has no height) |
| { aspectRatio: 16 / 9 } | Container width, fixed ratio | |
| { width: 360, height: 640 } | Fixed size (numbers are px, strings any CSS length) | |
| 'auto' | Follows the video’s aspect ratio once known (resizes once) |
JavaScript API
createTryOn(target, options) takes an element or a CSS selector and returns the try-on instance. With the web
component, the instance is element.tryon.
| Method | Returns | Description |
|---|---|---|
| play() | Promise<void> | Starts the try-on (opens the camera on first call). Retries after a camera error. |
| pause() | void | Pauses the video and the tracking. play() resumes. |
| setFrame(frame | null) | Promise<void> | Shows another frame (or none). Photos are cached; changing only settings is instant. |
| setLenses(lenses) | Promise<void> | Changes the tint, reflectivity or reflection image. |
| setSource(source) | Promise<void> | Switches between camera, video and photo. |
| setMaxFaces(n) | Promise<void> | Tracks up to n faces (1–4), live. |
| setFit(fit) | void | 'cover' (crop) or 'contain' (letterbox). |
| setMirror(boolean) | void | Mirrors the display (default: on for the selfie camera). |
| snapshot(options?) | Promise<Blob> | Image of the current view with the glasses, as displayed. Options: type, quality. |
| measurePd(options?) | Promise<{ mm, samples }> | Pupillary distance in mm, median of frontal frames. Options: samples, timeoutMs. |
| setAnalytics({ persistent }) | void | Analytics consent (see Privacy). |
| setLoading(boolean) | void | Shows the loader over the stream, e.g. while your page loads a product. |
| setSmoothing({ minCutoff, beta }) | void | Tunes the pose smoothing (steadiness vs. reactivity). |
| resetTracking() | void | Forgets the current pose (rarely needed). |
| setDebug / setShowOccluder / setShowTemplate(boolean) | void | Debugging aids: stats and face points; invisible head and hinges; photo template overlay. |
| on(event, callback) | () => void | Listens to an event; returns a function that stops listening. |
| off(event, callback) | void | Stops listening. |
| destroy() | void | Stops the camera, frees the GPU and removes the widget. |
| state | UiState | Read-only snapshot of the current state (see State). |
| isPlaying | boolean | Whether the try-on is running. |
Snapshot and pupillary distance
// Save a photo with the glasses on (JPEG Blob)
const blob = await tryon.snapshot({ type: 'image/jpeg', quality: 0.9 });
const url = URL.createObjectURL(blob);
Object.assign(document.createElement('a'), { href: url, download: 'my-glasses.jpg' }).click();

// Measure the pupillary distance (the visitor looks straight at the camera)
try {
  const { mm } = await tryon.measurePd();
  pdInput.value = mm; // e.g. 62.5
} catch (error) {
  alert(error.message);
}
Events
| Event | Payload | When |
|---|---|---|
| ready | – | Everything is loaded (before the camera starts). |
| play | – | The try-on started or resumed. |
| pause | – | The try-on was paused. |
| faces | { count } | The number of detected faces changed (0 = no face). |
| frameload | frame | null | A frame finished loading and is displayed. |
| error | { code, message } | Something failed (see Errors). |
| ui | UiState | Any state change; handy to sync your own UI. |
const off = tryon.on('faces', ({ count }) => {
  badge.textContent = count ? 'Face detected' : 'Look at the camera';
});

tryon.on('error', ({ code, message }) => {
  if (code === 'camera') showCameraHelp();
  analytics.track('tryon_error', { code, message });
});

tryon.on('play', () => analytics.track('tryon_started'));

off(); // stop listening
State
tryon.state is a read-only snapshot; listen to ui to be notified of changes.
| Field | Type | |
|---|---|---|
| status | 'idle' | 'loading' | 'ready' | 'playing' | 'paused' | 'error' | 'idle' = waiting for the start click |
| error, canRetry | string | null, boolean | Error message shown, and whether play() can retry |
| faceCount | number | Faces currently tracked |
| sourceType | 'camera' | 'video' | 'image' | |
| videoSize | { width, height } | Resolution of the camera/video |
| fit, mirror, debug | Current display settings | |
| stats | { fps, inferenceMs, delegate } | Performance (delegate: GPU or CPU) |
Options
| Option | Default | Description |
|---|---|---|
| license | – | Your license key (required in production) |
| frame | null | The glasses to show: see Frame settings |
| lenses | {} | { tint: string[], reflectivity: 0–1, reflection: image URL } |
| source | { type: 'camera' } | { type: 'camera', facingMode?, deviceId?, width?, height? } | { type: 'video', src, loop? } | { type: 'image', src } |
| size | 'container' | 'container' | { aspectRatio } | { width, height } | 'auto' |
| fit | 'cover' | 'cover' | 'contain' |
| mirror | true for the selfie camera | Mirror the display |
| autoplay | false for the camera, true otherwise | Start without a click. The camera never opens before a click unless true |
| startButton | true | Show the built-in start button |
| preload | true | Download the tracker (~3 MB) before the click, for an instant start |
| maxFaces | 1 | Faces tracked at once (1–4) |
| analytics | { persistent: true } | Anonymous visitor id kept in localStorage (new vs returning) |
| smoothing | { minCutoff: 1.2, beta: 0.25 } | Pose smoothing |
| theme | { color: '#007bff', background: '#0d0f12' } | Accent colour (buttons, loader) and letterbox colour |
| messages | – | Any UI text, see below |
| assets | public CDNs | { wasm, model } to self-host the face tracker |
| server | https://svalbox.com | Svalbox server (license and analytics) |
Frame settings
Everything that describes the glasses lives in the frame object, so each product keeps its own settings.
| Setting | Default | Description |
|---|---|---|
| front | – | Front photo URL (required) |
| left | – | Left temple photo URL |
| right | left, mirrored | Right temple photo URL |
| lenses | – | Lens mask URL (needed for tints and reflections) |
| productId | – | Your reference; shown in your dashboard’s most tried frames |
| widthMm | 130 | Real hinge-to-hinge width; sets the scale |
| wrapMm | 9 | How far the front curves back towards the hinges (sport: 20–30) |
| thicknessMm | 3.5 | Front thickness (0 = flat) |
| templeThicknessMm | 2 | Temple thickness |
| tiltDeg | 0 | Tilt of the whole glasses; positive = bottom towards the face |
| templeAngleDeg | 0 | Temples up (+) or down (−) at the hinges |
| splayDeg | automatic | Outward angle of the temples |
| templeFadeMm | { start: 75, end: 100 } | Temples fade out between these distances from the hinge, as if behind the ears; false = no fade |
| templeLengthMm | widthMm | Real length shown by the full temple photo |
| offsetMm | { x: 0, y: 0, z: 0 } | Moves the glasses (y up, z towards the camera) |
| templeOffsetMm | { x: 0, y: 0, z: 0 } | Moves the hinge points |
| autoAlign | true | Detect frame width and hinges from the photos |
| coverage | 0.5 | Frame share of the front photo width (only with autoAlign: false) |
HTML attributes
For <svalbox-tryon>. Attributes marked “live” can change at any time. Advanced frame settings (wrap, angles…)
go through element.tryon.setFrame().
| Attribute | ||
|---|---|---|
| license, server | As the options | |
| front, left, right, lenses, product-id, width-mm | live | The frame; changing them switches the frame |
| tint, reflectivity, reflection | live | Lenses; tint colours separated by ";" |
| source, src | live | source = camera | video | image |
| size | container | auto | 16/9 | 360x640 | |
| fit, mirror, max-faces, debug | live | |
| autoplay, start-button, preload | "true" / "false" |
Text and colours
Every text can be replaced, for example to translate the widget:
createTryOn('#tryon', {
  license,
  frame,
  theme: { color: '#c2410c', background: '#111827' },
  messages: {
    start: 'Essayer en direct',
    startHint: 'L’image de votre caméra reste sur votre appareil.',
    centerFace: 'Placez votre visage au centre',
    cameraDenied: 'Autorisez la caméra dans votre navigateur pour essayer les montures.',
    noCamera: 'Aucune caméra trouvée.',
    retry: 'Réessayer',
  },
});| Key | Default | Where |
|---|---|---|
| start | Start virtual try-on | Start button |
| startHint | Your camera image is processed on your device and never uploaded. | Under the start button |
| centerFace | Center your face in the frame | When no face is found |
| cameraDenied | Camera access was denied. Allow it in your browser settings to try frames on. | |
| noCamera | No camera was found on this device. | |
| retry | Try again | Button after a camera error |
| noWebgl | Your browser does not support WebGL. | |
| license | Svalbox license refused or expired… | |
| loadFailed | The virtual try-on could not be loaded. |
Privacy and consent
Face tracking runs entirely in the browser: no image or face data is ever sent. For your dashboard, the widget sends anonymous usage events (try-on started, frame viewed, snapshot…) and keeps a random visitor id in your site’s localStorage to tell new from returning visitors. Svalbox stores neither IP addresses nor the raw id. If your consent policy requires it:
// Before consent: anonymous, session-only statistics, nothing stored on the device
const tryon = createTryOn('#tryon', { license, frame, analytics: { persistent: false } });

// Once the visitor accepts analytics cookies (applies from the next session)
tryon.setAnalytics({ persistent: true });

// If consent is withdrawn: deletes the stored visitor id
tryon.setAnalytics({ persistent: false });
Errors
Errors are shown in the widget and emitted as error events with a code:
| Code | Cause | What to do |
|---|---|---|
| camera | Camera refused or missing | Shown with a "Try again" button; play() retries |
| license | Unknown key, inactive license, or a domain not in your license | Check the key and allowed domains in your dashboard |
| webgl | The browser or device can’t render 3D | Rare: very old browsers or GPU blocklists |
| source | A video or image could not be loaded | Check the URL and CORS headers |
| load | A frame photo or the tracker failed to load | Check the photo URLs (CORS for other domains) |
CSP and self-hosting
If your site uses a Content Security Policy, allow script-src https://svalbox.com https://cdn.jsdelivr.net, connect-src https://svalbox.com https://cdn.jsdelivr.net https://storage.googleapis.com and worker-src blob:. Frame photos on another domain need CORS headers. The face tracker can be self-hosted:
createTryOn('#tryon', {
  license,
  frame,
  assets: {
    wasm: '/vendor/mediapipe/wasm', // contents of @mediapipe/tasks-vision/wasm
    model: '/vendor/mediapipe/face_landmarker.task',
  },
});
Supported: current Chrome, Edge, Firefox and Safari on desktop, iOS 15+ and Android. The camera requires HTTPS (or localhost).